
Система контроля давления в шинах мотоцикла (TPMS) с USB-выходом, ЖК-дисплей, датчик
Товар



7 469 ₽
Система контроля давления в шинах мотоцикла (TPMS) с USB-выходом, ЖК-дисплей, датчик
- 0 раз купили
- 0 оценка
- 20 осталось
- 0 отзывов
Доставка
Характеристики
Артикул
B0GXTZYTXZ
Identyfikator produktu
B0GXTZYTXZ
Marka
BJdfgE
Producent
BJdfgE
Numer modelu
JBDBPCGMJ
Numer części
JBDBPCGMJ
Kraj pochodzenia
Chiny
Описание
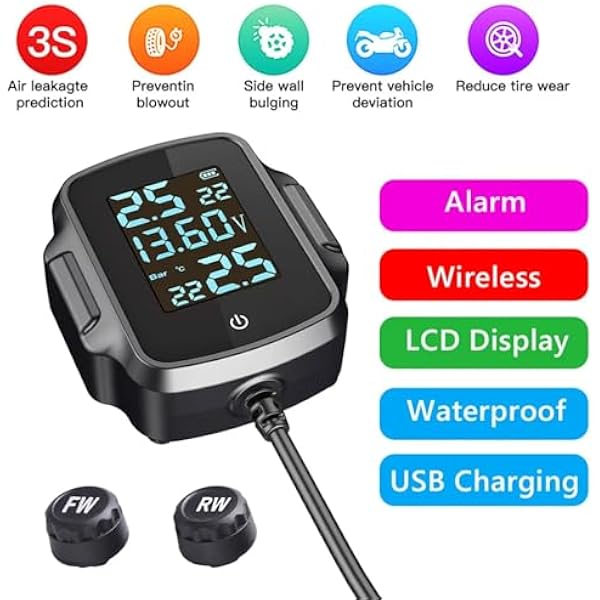
- 1. Advanced Monitoring & Safety The motorcycle TPMS is a stateoftheart safety device designed to provide realtime alerts on tire conditions ensuring that youre warned of any potential issues in advance By keeping an eye on tire and temperature this system plays a crucial role in preventing accidents and safeguarding both riders and passengers
- 2. Real-time Alerts: Our motorbike tire monitoring system is equipped with advanced sensors that notify you through audible alarms and flashing icons on the display if there is any deviation in tire or temperature from the normal range, enabling you to address issues promptly and maintain optimal tire performance.
- 3. Temperature and Tracking: With the tyre temperature alarm system, you can ride with confidence knowing that your motorcycle's tire and temperature are constantly monitored. The system's immediate feedback allows for swift action to maintain tire integrity and vehicle performance.
- 4. Convenient Charging Capability: This motorcycle tire sensor is not just a monitoring tool; it also includes a QC 3.0 fast-charging USB output, allowing you to charge devices like smartphones, tablets, and power banks on the go, so you're always connected and powered up during your rides.
- 5. Comprehensive Vehicle Health Indicator: The temperature monitoring alarm system supports battery voltage detection and showcases it on the display. Coupled with a low-voltage alarm function, it ensures that you're always informed about the health of your motorcycle's battery, contributing to the overall maintenance and longevity of your machine.
Specification:Tire setting range: 0.1~6.0BarTemperature setting range: 60~100Working temperature: -20~+80Storage temperature: -30~+85Power voltage: DC 12VOutput voltage: DC 12V, 9V, 5VFrequency: 433.92MHz±20.00MHzReceiver:Working temperature --20~80Storage temperature: -30~85Power-on voltage: DC 5VFrequency: 433.92MHz±20.00MHzSensor:Working temperature: -20~80Storage temperature: -30~85range: 0~6.6Baraccuracy: +/-0.1BarTemperature accuracy: +/-3<;10dBFrequency: 433.92MHz±20.00MHzBracket installation instructions1. Unscrew the 2 screws, put on the motorcycle/electric bike/bicycle and tighten;2. Place the mounting head of the bracket toward the position you need, and confirm that the bracket is firm;3. Install the tire receiver on the bracket, tighten it and then lock it; use the ball head to rotate the tuning knob to move the joint part to adjust the appropriate angle appropriatelyPower installation instructions1. When installing, the power cord needs to be connected behind the ignition switch, and the power can be automatically cut off after shutting down. The red connects to the 12V positive pole and the black connects to the ground.2. Install the fixed bracket on the handlebar and lock it tightly. Install the host on the bracket and adjust the angle and lock it.3. Install the sensor when the host is turned on. First install the tamper ring into the valve nozzle, then install the sensor on the valve according to the position and tighten it, then screw the tamper ring back and tighten it. If you find that there is no corresponding position on the host If the is displayed, reinstall the sensor at the corresponding position.Sensor battery replacement instructions:When replacing the battery of the sensor, please disassemble one by one, install the shell, do not mix or disassemble and install at the same time; it can effectively prevent the sensor from being misplaced and installed on other tires due to the wrong shell. (Button CR1632, working temperature is -30~+80); it is available in stores.1. Before disassembling the sensor, please prepare a nut wrench, turn the nut clockwise to separate the nut and the sensor, and then remove the sensor counterclockwise;2. Use a wrench to unscrew the upper cover of the sensor in a counterclockwise direction;3. Take out the old battery from the battery clip and do a good job of environmental protection classification;4. Distinguish the positive and negative positions (positive "+" facing up); install a new button battery CR1632.5. Screw on the upper cover of the sensor, and then tighten it clockwise with a wrenchNote:There may be slight size deviations due to manual measurement, different measuring methods and tools.The picture may not reflect the actual color of the item because of different photographing light, angle and display monitor.
Гарантии
Гарантии
Мы работаем по договору оферты и предоставляем все необходимые документы.
Возврат товара
Безопасная оплата
Банковской картой, электронными деньгами, наличными в офисе или на расчётный счёт.
Отзывы о товаре
